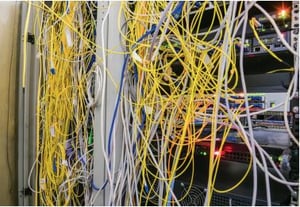
Do you cringe every time you walk into your network closet? If so, you’re not alone. “Cable management porn” is a real thing (and don’t worry, a Google search won’t turn up anything your firewall should be blocking!). Our IT Engineers have been down the network closet organization road many times, so we have some tips if you finally want to tackle this project. With an unprecedented number of people working from home right now, you may never find a better time than now—other than if you move—to address this issue.
TIP #1 : Use a Cable Tester to Help Document Your Jacks/ Patch Panels. Save yourself time and a headache with a tool that
will allow you to flash the port’s LED lights, such as Fluke Networks Intellitone Pro 200 or NetAlly LinkSprinter 300.
What’s good about the LinkSprinter is it supports NetAlly’s live link cloud service. If you buy multiple units, it will
enable you to have multiple people work on the project simultaneously and aggregate the data.
TIP #2 : Create a Map with Color-Coded Cables. Below you will find the minimum data we recommend to include on your Map and some ideas for how to color code your cables.
| MAP DATA TO COLLECT | |
| Label | Example Data |
| Source Location | IT Room |
| Source Device | David's PC |
| Port | 703-D1 |
| Cable Number/Color | D703/White |
| Source Cable Type | Cat 6 |
| Destination | Network Closet on 2nd Floor |
| Location Destination | Switch 2 |
| Destination Port | Port-6 |
| Destination Cable | Cat-5 |
| Connector | RJ45 |
| Drawing | 2nd Floor Engineer Map |
| Notes | Have had issues with throughput |
| CABLE COLOR CODES | |
| Red | firewall/wan |
| Blue | interconnect between switches |
| Green | vlans |
| Black | voip |
| Purple | external, i.e. Client Sublets space |
| Yellow | servers |
| White | standard equipment |
| Orange | shared networks , i.e. public space meeting rooms |
| Grey | printers/scanners or devices that are 10/100 |
| Pink | Cross-over or building management systems, i.e. fire alarms, cameras, etc. |
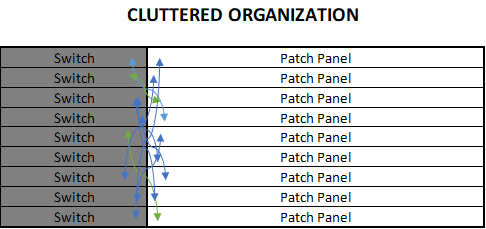
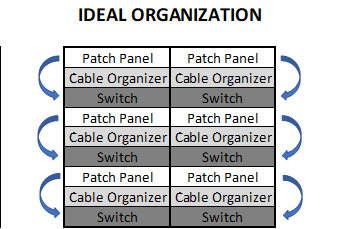
TIP #3 : Consider repositioning equipment to accommodate for better cable organization. The worst network closets get that way because the switches are too far from the patch panels, requiring long, messy cables. Moving this equipment will allow you to have shorter cables and make space for a cable organizer:
TIP #4 : Determine the ideal cable lengths and colors needed and keep them in stock. If you rearrange your equipment the right way, the average cable lengths you will need will be two to three feet. Store enough of the appropriate color and size cables to make your job easier along the way, and then keep them in stock to ensure that once you organize, it stays organized. To be precise in your cable measurements, you can look at your server rack and measure how many U’s there are between your patch panels and your switches. For every four U’s, you’ll need approximately two feet of cable using a cable management system such as Neat Patch.
As stated earlier, we’ve been down this road many times before. There is a delicate balance between the time you take to
reorganize and the benefits reaped. If you’re thinking of tackling this project and need an extra set of experienced eyes, call us at 718-690-2044 ext.3 or click here to schedule a conversation with one of our IT Engineers.
This article was featured in our October client newsletter for IT Leaders, click below to read the rest of the issue!