An exercise to develop a procedure to satisfy the New York Forward Health Screening requirement unveiled what is possible when combining Microsoft Teams, Outlook, Forms, and Flow.
See below for a step by step process for how we are performing our Employee & Visitor health assessments electronically using these tools. Even if you have something else set up already, this could spark an idea to make it more efficient/effective, or unveil methods that may open the door to improve other processes.
In order to use this process you must have a Microsoft 365 Business Account [If you don’t have one and are interested in getting one for your small business, contact us!]
- Set up a Form using Microsoft Forms (forms.office.com) The New York Forward guidelines include the minimum questions you should be asking. See below to access links to the templates we have put together for Employees and Visitors to save you time.

- Set up a shared mailbox in Microsoft Outlook for responses to the Health Screening forms to go.
- Set up a Microsoft Flow (flow.microsoft.com) so that depending upon the answers to the form you created, an e-mail will be sent to the shared mailbox saying “ACCESS GRANTED” or “ACCESS DENIED” with the person’s name and the time stamp. You will need to set up a separate flow for the Employee and the Visitor form:
-
- Flow Step 1: Choose the Trigger, “When a new response is submitted” and select the appropriate form.

- Flow Step 2: Choose the Action, “Get response details”. This will allow you to create subsequent actions using specific responses from the form previously created.

In “Form Id” select the appropriate form, and in “response Id”, choose “add dynamic content” and select “List of response notifications Response Id”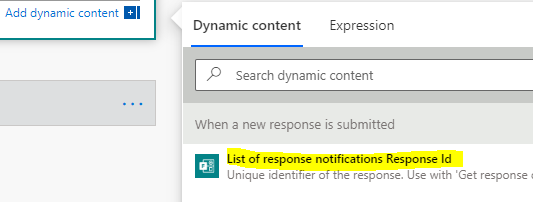
- Flow Step 3: Choose the action, “Condition”. In the forms we created, there are (3) questions, whereby if someone answers “yes”, they should be denied entry to the office. Because you added “get response details” in the previous step, all of your questions are can be selected via dynamic content. So you simply pull up those questions in order to trigger the following condition:
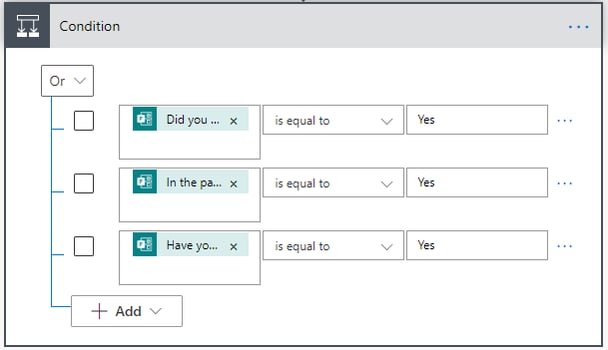
Then, if “yes” to the above condition, configure the e-mail to say “ACCESS DENIED”

If “no” to the above condition, configure the e-mail to say “ACCESS GRANTED”

- Flow Step 1: Choose the Trigger, “When a new response is submitted” and select the appropriate form.
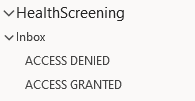
- Have someone monitor the shared inbox to ensure responses are received for employees entering the office, file the responses under the appropriate outlook folder, and take action accordingly.
- Create a Channel in Teams for COVID-19 that your entire company has access to, and place the form there as a “tab” for easy reference:

- Create a Notification Flow to post into Teams and/or send an e-mail.
- Flow Step 1: Create the Trigger, “Recurrence”. We have specified the action to run every day during the week at 8:30am as a reminder for people before they come into the office.

- Flow Step 2: Create the Action, “Post a message as the Flow bot to a channel”. You can choose the COVID channel you just created, and post a link to the form there as well for easy access. In order to create a hyper-link, you must enclose the form web address with “< >” i.e., <https://myformlink.com>

You can also @ mention employees so they have a popup notification in Teams, but you must mention each name separately, and in this format: <at>employeeemail@yourdomain.com</at> - Flow Step 3: Create the Action, “Send an email”. You can put a hyperlink to the form in the e-mail as well for easy access.

We hope you find this process helpful! As part of our Community Joy & Unity program we can provide a free 15-minute consult if you run into any roadblocks implementing this process on your own. If you need more assistance than that, it is best to schedule a conversation with one of our IT Experts to discuss your needs. As always, we wish you the best on your journey!


